Citroen C4 1.6 HDi service
Having failed to find any information on how to change the fuel filter on my 2012 C4 1.6 HDi, with the 1.6 HDi DV6 engine, I began to write a reminder for myself for the next time. And although it is not the sort of material I have on the rest of this site, I thought that it might help someone else, so I tidied it up and put it on the web. So, hopefully someone else will benefit from my experience. For brake info see Citroen C4 brakes.
Before you start, check that your engine and layout is the same as mine, see the pictures. If you have the DV6 engine, you will see the “DV6” marked on the engine mounting on the left side of the engine as you look in the engine bay.
Oil change
Make sure the engine is well heated so that the oil flows easily, and have the car level.
Remove the oil filler cap.
Remove the under-tray - there are seven 10mm bolts, and two 10mm nuts holding it on.
Remove the drain plug at the bottom of the engine (21mm socket) and let oil drain out into a suitable receptacle.
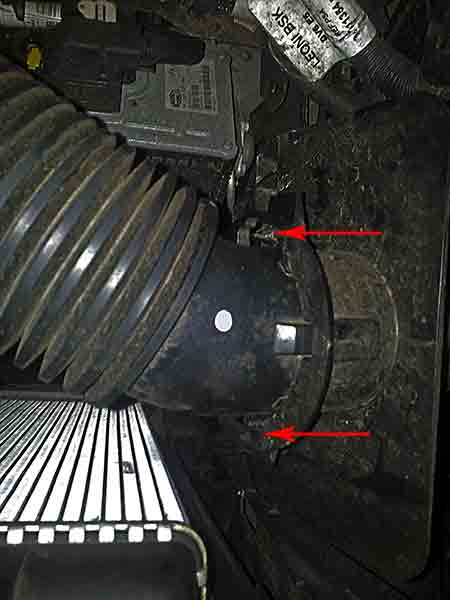
Now remove the oil filter - this will help to drain the oil as much as possible. You access it from above. The filter is on the right-hand side of the engine, under various tubes, see picture below, taken from above.
For easier access to the filter, remove the air inlet tube above the filter - it is held on the front end by two lugs which can be pushed outwards gently to allow release of the tube, see the picture below. When that end is released, just rotate and gently pull the other end and it will just slide out;
Put a rag under the oil filter to catch any spillage, then unscrew the filter lid with a 27mm socket on a long extension. When you remove the filter lid the filter will normally come out with it. You have to pull the old filter off the lid, and it can be quite a tight fit.
Now allow all the oil to drain out - leave for 10 minutes or so.
To fit the new oil filter, do not at this point attach it to the filter lid that you have removed. Push the filter carefully into the filter housing on the engine, and make sure the little projecting spigot on the filter clicks into the depression in the filter housing. Fit the new seal on the lid, and then screw the lid back on - you will need to push and turn at the same time to get it to catch on the threads.
Now refit the drain plug, preferably using a new sealing washer.
Fill the engine with the recommended synthetic oil (about 4 liters) until the dipstick reads okay (about ¾ liter between max and min marks), and put the oil filler cap back on.
Run the engine at idle until the oil pressure warning lamp goes out and for a short while after that, wait 5 minutes or so, then check the oil level again and you’re done.
Air filter
Remove soft soundproofing cover from engine, see picture below.
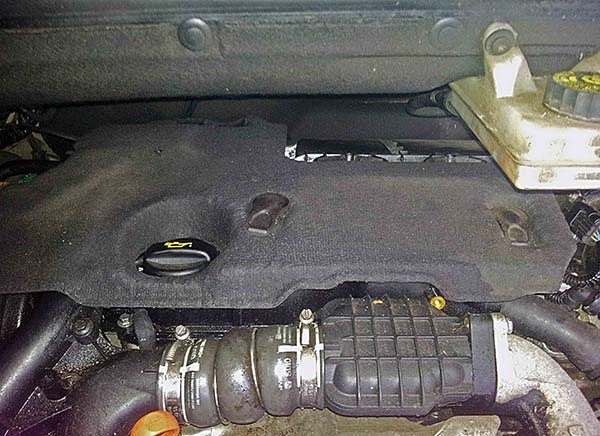
Air filter is at back of engine on the right hand side, see picture below.
Remove the three Torx 20 screws at front of filter and release clip at RHS. Filter cover should now rotate up and lift out. Note: there is not much clearance above the screws, so you will need the right tools to be able to do this. When refitting, do not over tighten the screws when refitting as they screw into plastic and you could ruin the screw-holes.
Fuel Filter
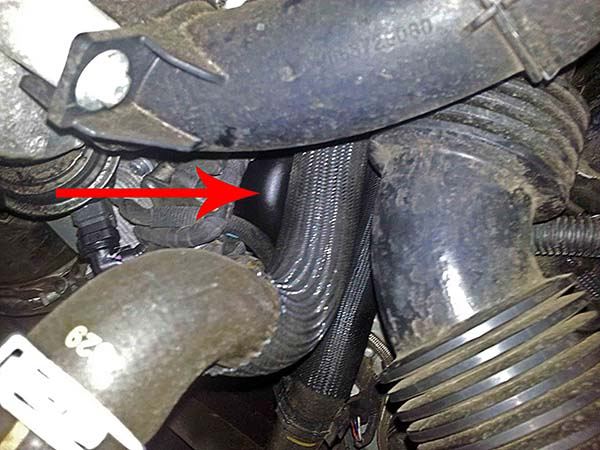
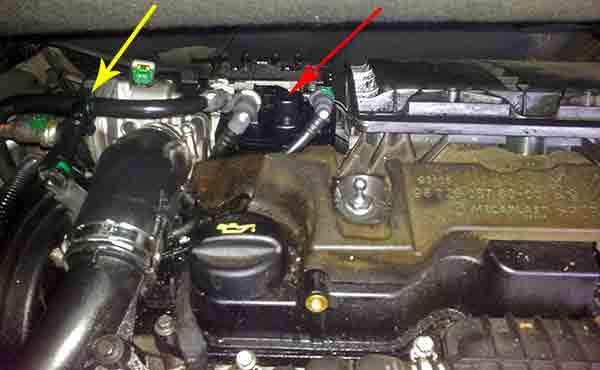
There are different fuel filters for the 1.6 Diesel engine. I had some trouble getting the correct filter for mine, so make sure you have the correct replacement unit before you start. If you remove the soft soundproofing cover on the top of the engine (see air filter section above) and if it then looks like the picture below (the red arrow points to the filter), then this guide is applicable - otherwise better look elsewhere for how to change your fuel filter.
The filter itself looks like this:
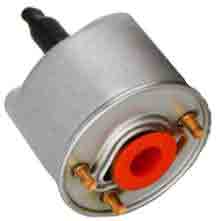
The codes for this filter are:
| Fram | P11047 |
| Mecafilter | ELG5406 |
| Coopers Fiaam | FP5938 |
| Muller | FN292 |
| Comline | EFF246 |
| Citroen | 1906E6 |
Changing the fuel filter
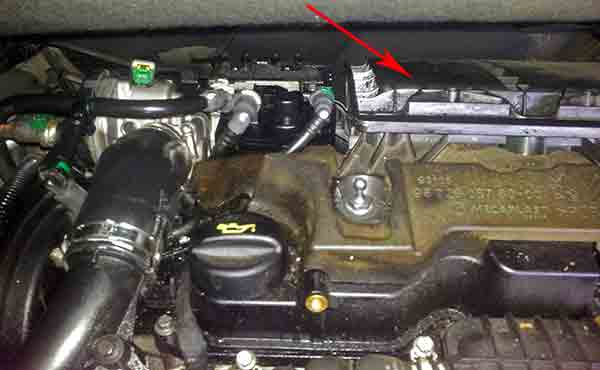
Before you start, make sure you have the tools to do the job, in particular ensure that you have tubing that will enable you to prime the fuel system so that the engine will start, see the priming section below. Remove soft soundproofing cover from engine. The fuel filter is at back of engine on the left hand side, see picture above.
Unscrew the two screws with 8mm hex heads at the back of the top of the black filter assembly (not the 10mm screws !). They are captive screws so they cannot fall out - but if you lose a socket here you will never find it, so take care. Now undo the two rightmost fuel lines. Now find a small clip about 10cm down the leftmost line which holds the fuel line in position (see yellow arrow in the picture above) - undo this clip so the tube will not kink when you remove the filter. Next lift the filter assembly out with this left line still attached. The connection on this line has a very fiddly catch, so it is easier to work with the filter assembly lifted out of position. To release the catch, you have to press down the outermost sides of the catch and at the same time lift up the middle part of the catch. There is no positive locked/
Now unscrew the cap from the filter, there are three Torx 15 screws holding it on.
Now you can pull the filter apart from the cap - make sure you have read the notes below first !
NB: As soon as you pull the housing cap off the filter, the filter will then start leaking fuel out of the metal tube the bottom of it, so make sure you have a container underneath it to catch it !
NB: There is a long thin plastic shaft that projects down from the filter housing cap and which seals the bottom of the filter, so make sure you pull the housing straight off the filter - if you pull it off at an angle you might break this plastic shaft, so be careful.
It’s messy trying to fill the new filter with diesel before attaching it, so I don’t bother, I just attach the new filter, making sure the triangular/
Now screw the filter back into place (if there is a plastic cover on the bottom metal tube of the filter, remove it first or the unit will not fit).
Priming the fuel system
You need to do this, otherwise its unlikely that the engine will start. There is a small pump on top of the filter assembly (where the red arrow in the picture point to), but I didn’t find this to work very well, so I use a different method. You will need some soft tubing with an internal diameter of about 9mm that you can push onto the inlets of the top of the fuel filter assembly. I made up a simple kit which makes this easy and you won’t get a mouthful of fuel, see picture below. While you don’t have to have a syringe or clear tubing, it makes the job a lot easier.
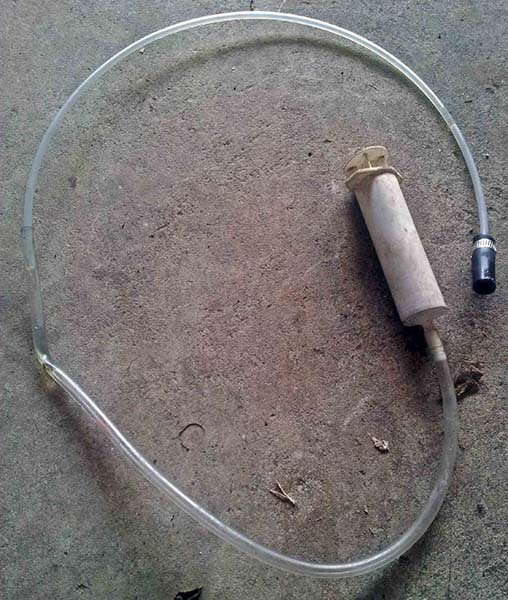
To use it to pull up fuel, pull out the syringe, kink the tube to stop the fuel running back, remove the syringe, push the syringe closed, reattach it, and repeat until you see the fuel coming into the tubing.
If you are putting in the fuel caught from the old filter, do this:
Attach the two rightmost fuel lines. Attach an appropriate tube to the leftmost inlet of the filter assembly and inject the previously caught diesel in by this line. Then attach the leftmost fuel line to its inlet tube, and detach the middle fuel line. Attach a suitable tube to this middle inlet of the filter assembly and suck out until the fuel comes out without bubbles. Then attach the middle fuel line to its inlet tube on the filter assembly.
If you aren’t putting any fuel into the filter, do this:
Attach the rightmost and the leftmost fuel lines. Attach an appropriate tube to the middle inlet of the filter assembly and suck out until the fuel comes out without bubbles. Then attach the middle fuel line to its inlet tube on the filter assembly.
Now you should be good to go.
Alternative priming method
A reader, Sergey Vorobiev, wrote to me noting that he found another method of priming without using the syringe, as follows:
It’s really easy if you understand the construction of that filter cap. That thin rod which is going inside the filter is meant to keep that bottom hole closed (from my understanding). If you replace the filter and keep that bottom hole closed, you can pump the filter to prime it as much as you wish, it won’t work. So you can prime it without using any additional tools, you have to lift that rod up by turning the ‘fake’ connector in the middle of the cap clockwise and lift it up. Prime the filter and once the pumping becomes hard, push the rod back in and turn it anticlockwise to close the hole. That’s it !
Service Schedule
| Normal Conditions | ||
| Change Oil | 12,500 Miles | 1 year |
| Replace Oil Filter | 12,500 Miles | 1 year |
| Replace Fuel Filter | 12,500 Miles | 1 year |
| Check date on puncture repair kit | 12,500 Miles | 1 year |
| Change Brake Fluid | 2 years | |
| Air Conditioning Filter | 25,000 Miles | 2 years |
| Air Filter | 37,500 Miles | 4 years |
| Particle Filter Check/Top up Reservoir level | 50,000 Miles | |
| Check Particle Filter | 100,000 Miles | |
| Coolant | 112,500 Miles | 9 years |
| Timing Belt | 112,500 Miles | 9 years |

Rationale: Every logical argument must be defined in some language, and every language has limitations. Attempting to construct a logical argument while ignoring how the limitations of language might affect that argument is a bizarre approach. The correct acknowledgment of the interactions of logic and language explains almost all of the paradoxes, and resolves almost all of the contradictions, conundrums, and contentious issues in modern philosophy and mathematics.
Site Mission
Please see the menu for numerous articles of interest. Please leave a comment or send an email if you are interested in the material on this site.
Interested in supporting this site?
You can help by sharing the site with others. You can also donate at where there are full details.